
by Marcel Dufresne
Jun 14, 2024
If you are something like me, you have way too many icons populating the right-hand side of the menu bar on your Mac. I know that a lot of these could be switched off, but I like the hassle-free option of simply clicking on them rather than having to go into the System Preferences to use them. It saves time and I often can’t quickly locate the one I am looking for with all the other items in the System Preferences.
It is for these reasons that I turned to Bartender over four years ago. With this application, I was able to hide over half of my menu bar items. By hiding some of them, I was able to free up space and make it much easier to find the one I wanted to use. The hidden items are quickly revealed with a click of the Bartender icon or a keyboard shortcut so that even the ones I use infrequently are still there at my fingertips. Apple has allowed the menu bar icons to be rearranged using the command (⌘) key to move them. Bartender does not interfere with this function and adds to it by allowing the hidden icons to also be rearranged the same way.

The newest version of the application is Bartender 5. It goes way beyond simply hiding the less-used menu bar items. It provides complete control of not only what is in the menu bar but how the hidden items can be displayed. The colour schemes and other interesting functions make customization of the menu bar a snap. Read on to learn about the complete workings of this valuable application.
The best way to point out the various functions of Bartender is to go through the application’s preferences. Bartender appears in the menu bar as an icon. I chose to move it to the far right, delineating the customizable icons from those that Mac OS does not allow to move. I added a spacer to further accentuate the division. There are several ways to gain access to the hidden items. First, which is my favourite, you can click on an empty menu bar space. You could also swipe or scroll in the menu bar or hover over an empty menu bar space. All of these can be turned on or off with the settings. The hidden items can be displayed in a number of ways. First, they can appear to the left of the initial items. This makes for a very long list of icons. I opted to have them displayed underneath those initial items so that there are two separate rows of icons. You can opt to remove the Bartender icon from being displayed. You can choose the icon used by Bartender. The spacing between icons can also be customized.

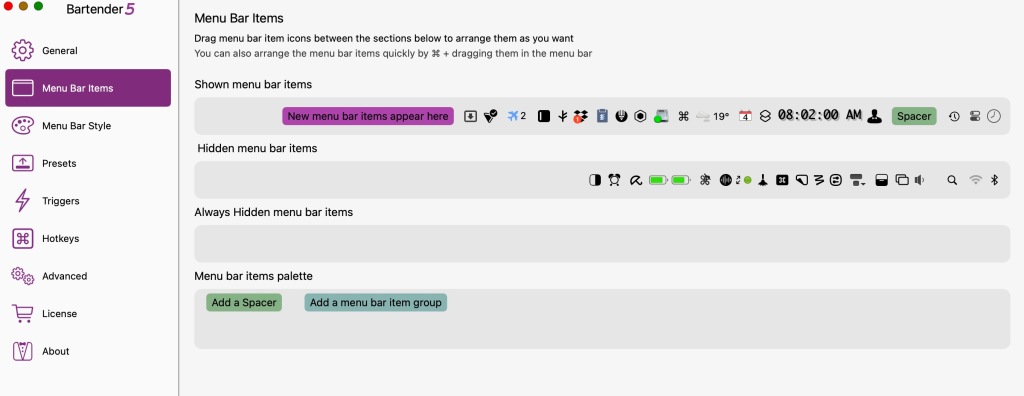
The main area in the settings that should concern you the most is the Menu Bar Items section. Here you can drag-and-drop icons between three sections to arrange them as you want. The sections are the shown menu bar items, the hidden menu bar items and the always hidden menu bar items. This section contains the main reason for using Bartender. The drag-and-drop ability makes it super easy to customize the menu bar. This area also contains the spacer that I mentioned earlier. The last part of this section enables you to add a menu bar item group. By dropping this icon into the set, you can now choose to group a set of icons into one icon to again save space and make it easier to find what you were looking for.

The menu bar style is a bonus section for me. I always like to add as much pizzazz to my screen with special folder icons and as much colour as I can. Bartender lets me play with my screen in ways that I could not before. If you right-click on an empty menu bar space, you call up this setting. I use more than one desktop and this section lets me alter each desktop differently from the others. First, there is the menu bar tint. Choose a colour or a gradient that suits your taste. Next, you can change the menu bar border thickness and colour. Lastly, you can play around with using rounded menu bars and desktop corners. My favourite is rounded separate sides which splits the right and left menu bar items with empty space. You can apply one format to all the desktops or do them, as I did, separately. At any time you can reset the menu bar and remove these fancy touches.
The next preference setting is for something called a preset. You can create a menu bar layout that is distinct from the others and apply it using a trigger such as a specific application. Thus when I use the Safari browser, I can set up which menu bar items are shown on the right-hand side. These two settings just add to the amount of customizing you can do. Once set and configured, you will find it a time saver.

The last Preference setting is the hotkeys section. Here you can add keyboard shortcuts to initiate specific functions. These include to ability to show the hidden menu bar items, to hide the left application menu (other than the Apple logo), and to show all the menu bar items. The Bartender has a search field to again make it easy to find a specific menu bar item. The more items you have, the harder it is to find the one you are looking for. The search field helps with this. You can set up a hotkey for this search field. Lastly, you can set up a hotkey to call up a specific individual menu bar item.

Bartender provides an easy way to display or hide the menu bar icons. It does not have a help manual as using Bartender is very intuitive. There is no learning curve. Bartender 5 has greatly simplified my menu bar. Instead of having over 30 icons to scan through, I have kept only the ones I use frequently, and have hidden the rest. I have rearranged them into a pattern that suits my taste. Now it is easy to locate the one I am looking for. The hidden ones are also rearranged into a suitable pattern. You can read more about Bartender from their official Web site. While there, download a trial version off it. Try it out for four weeks with access to all the features. After the trial period, you have to buy a license at the price of $22 (one-time fee). I am sure by that time you will want to keep using this app. It is one of the apps that I make use of every day. It is well worth the price.
